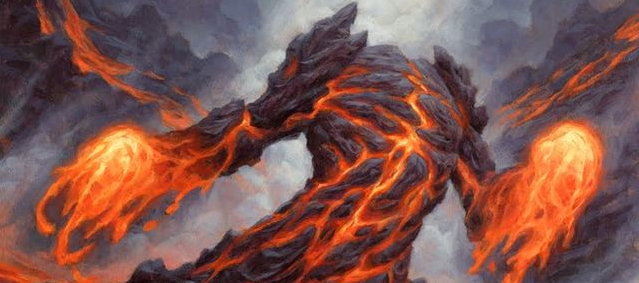
(Vent SentinelVent Sentinel | Art by Chris Rahn)
(Don't) Come at Me, Bro
“Most Ravnicans lead lives of desperate survival. Those who thrive are malleable enough to change with the ever-shifting politics of the guilds.”
- QuickchangeQuickchange flavor text
Defender decks, those built on the backs of Walls like Overgrown BattlementOvergrown Battlement and Wall of OmensWall of Omens, have existed for longer than you might think. Doran, the Siege TowerDoran, the Siege Tower, alongside cards that allow your Walls to attack (like the newer Assault FormationAssault Formation and the older Rolling StonesRolling Stones) has been a niche strategy since the early days of the format. It wasn’t common at Commander tables, but you could get caught defenseless if you weren’t wise to these builds.
However, this past summer, fans of turning a harmless Wall of DenialWall of Denial into an eight damage monster got the best commander possible when Arcades, the StrategistArcades, the Strategist was released. Arcades does everything that the defender deck strategy wants. Not only does it turn defense into offense, but it also turns every Wall into a Wall of OmensWall of Omens, so you are never truly wasting the cards in your hand. The Elder Dragon gives the strategy an inevitable win condition.
I guess this means that the defender deck is “solved”, doesn’t it? If you want to win with Walls, you go straight into Bant and play Arcades, the StrategistArcades, the Strategist, or maybe you throw it back to the older Doran, the Siege TowerDoran, the Siege Tower and call it a day. It’s all ready for you to put together and start smacking opponents with a Wall of ShardsWall of Shards.
But that’s not what Mind Bend is about. This article series is meant to break that notion that certain colors are the best for a particular strategy, and to forge new ground outside the confines of the already established. So how will we do that with Walls? Two words: Vent SentinelVent Sentinel.
A Time to Vent
Of all the 'defender matters' cards in the game, Vent SentinelVent Sentinel offers another way to “attack” with your Walls. Build up a formidable defense and start lobbing six or seven or eight damage at your opponents from behind your comfy fortress.
You can’t win on Vent SentinelVent Sentinel alone, though. Let’s look at how the Arcades, the StrategistArcades, the Strategist deck operates on a fundamental level to adapt it into one that stars Vent SentinelVent Sentinel. Luckily, EDHREC has some great stats on the de facto defender deck.
Arcades: the Strategy

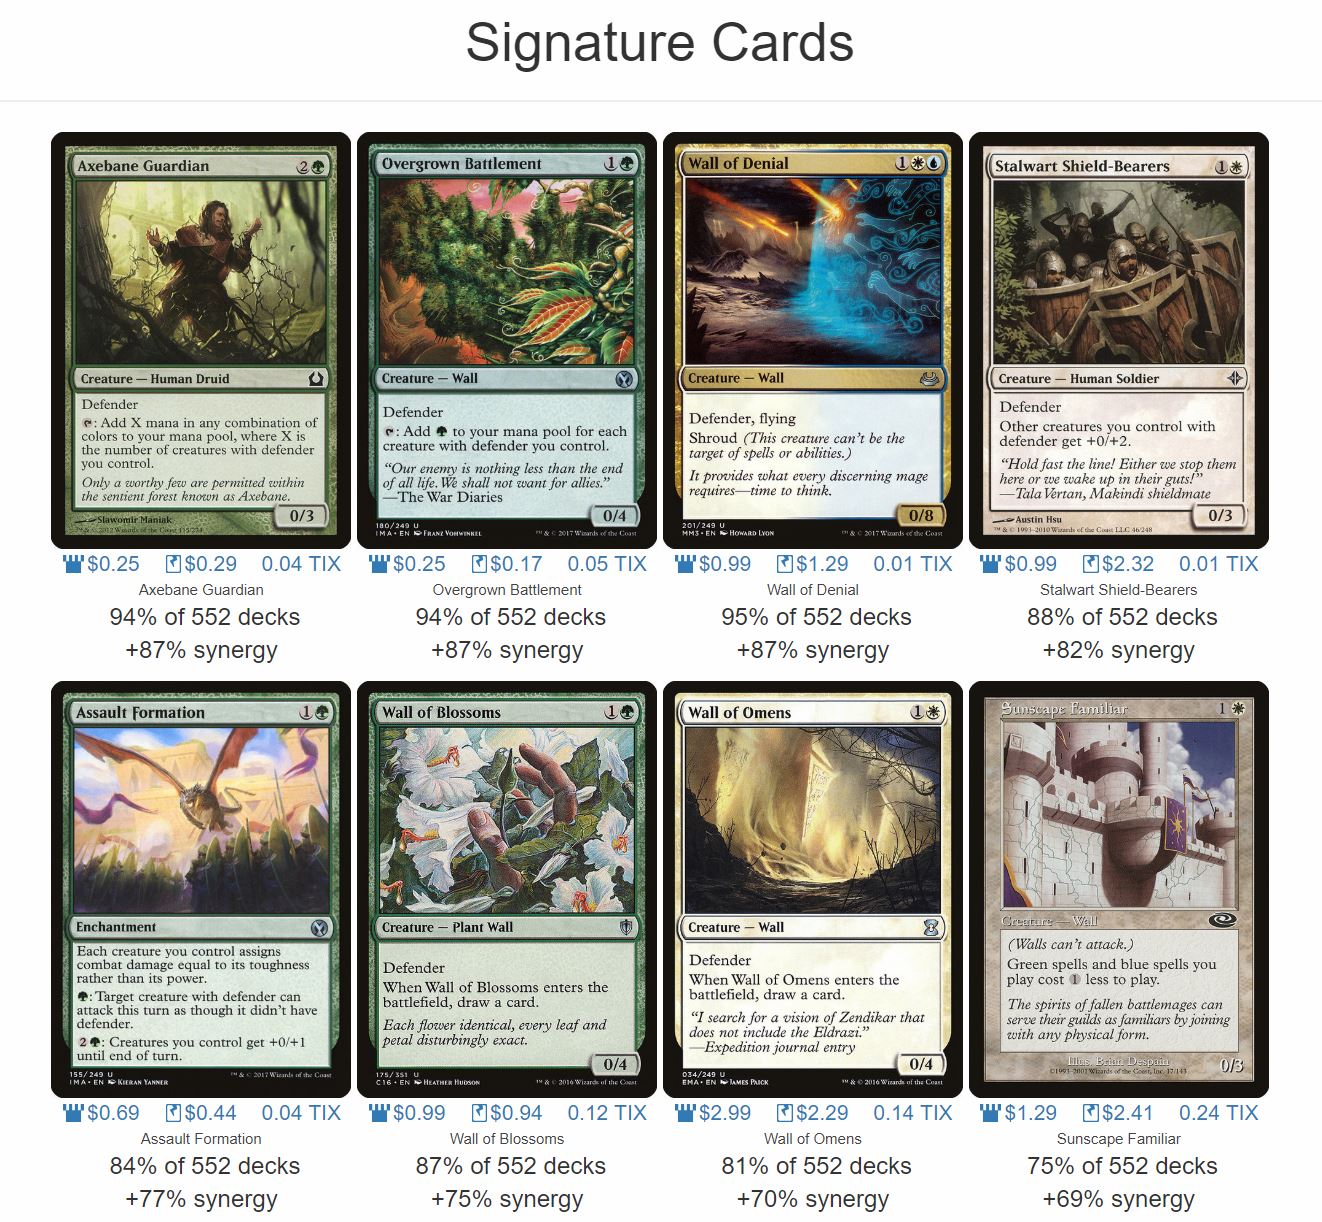
Arcades, the StrategistArcades, the Strategist’s Signature Cards says a lot about the build. It’s filled with the following:
- Cards that care about defenders, like Axebane GuardianAxebane Guardian and Overgrown BattlementOvergrown Battlement.
- Cards that make both defense and offense better for walls, as seen with Assault FormationAssault Formation and Stalwart Shield-BearersStalwart Shield-Bearers.
- Walls that draw more cards, like the aforementioned Wall of OmensWall of Omens.
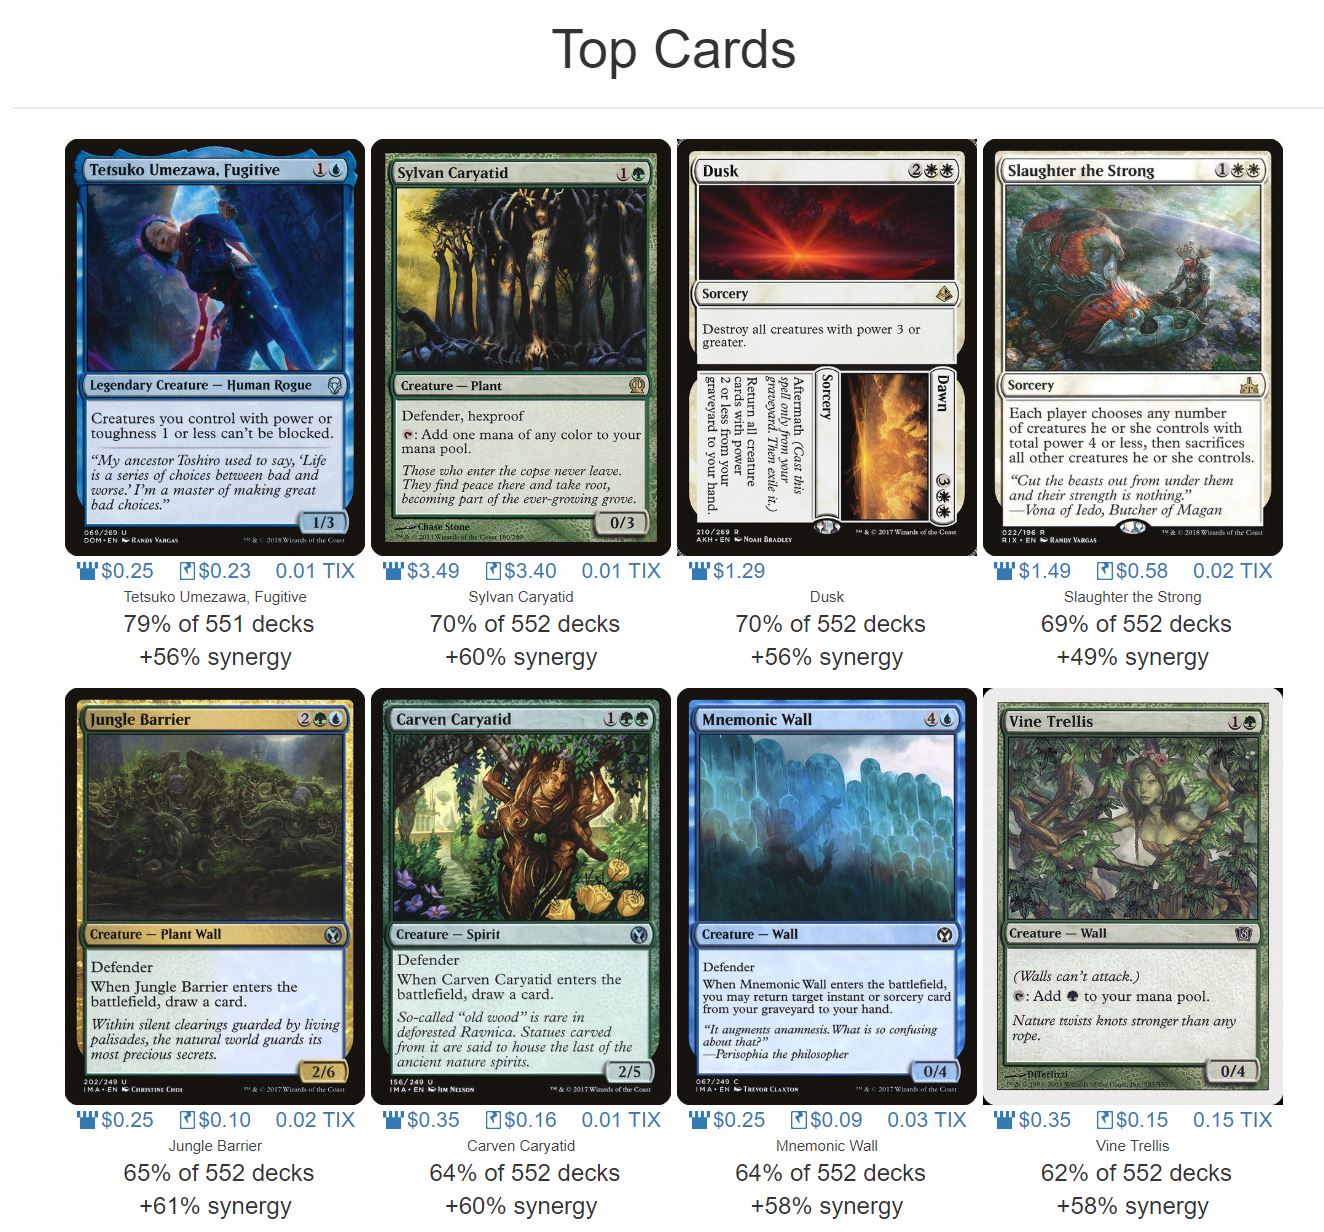
Going into the Top Cards section on EDHREC keeps up with some of these themes:

Two more cards in this group draw cards - Jungle BarrierJungle Barrier and Carven CaryatidCarven Caryatid - and Mnemonic WallMnemonic Wall also functionally 'draws a card' by getting back and instant or sorcery from the graveyard. Tetsuko Umezawa, FugitiveTetsuko Umezawa, Fugitive offers a clever way to push damage though.
The Top Cards section also delves into another part of the defender strategy: making use of cards that care about power (as in power and toughness, not the overall strength level of the card). Some of these punish high-power creatures, or provide benefits for low-power creatures. Tetsuko is one such card, while Dusk//DawnDusk//Dawn and Slaughter the StrongSlaughter the Strong offer one-sided board wipes that may never touch the deck’s defenders.
The rest of Arcades, the StrategistArcades, the Strategist’s EDHREC page is filled with goodstuff spells, save for the creatures section, which includes more defenders. However, those defenders are less versatile compared to the others reviewed above.
To sum up, the Arcades, the StrategistArcades, the Strategist deck is very straightforward, which means it should be easy to copy. The deck I’m aiming for should be able to draw cards easily, work with the defenders available, care a least somewhat about creatures’ power and toughness ratios, and then mix in all-around powerful cards to fill in the rest.
To the Dark Side
Unfortunately, to play Vent SentinelVent Sentinel, mono-red doesn’t have the kind of value that Arcades, the StrategistArcades, the Strategist generates, which makes sense, given red’s aggressive slice of the color pie. Incremental advantage is not a very red strategy.
This being Mind Bend and all, I’ve found the perfect solution, and all I had to do was add a little black into the mix. With Rakdos as part of spectacle of Ravnica Allegiance, it’s time to play the exact two colors not found in Arcades and hop on the value train that is Grenzo, Dungeon WardenGrenzo, Dungeon Warden.
Why Grenzo, Dungeon WardenGrenzo, Dungeon Warden? Because he can essentially turn defenders, typically cards with low power, into virtual Wall of OmensWall of Omens lookalikes. Wall of OmensWall of Omens costs two mana, and draws a card when it enters the battlefield. Packing a Grenzo deck with a fair amount of defenders means that each activation of his ability will convert two mana into a Wall from the bottom of your deck, without having to spend a card from your hand to do so. The end result with Wall of OmensWall of Omens and a successful activation of Grenzo, Dungeon WardenGrenzo, Dungeon Warden is a Wall in play and the same number of cards in hand before starting the process. They’re not equivalent, but are very much alike in most situations.
Walls Strategy? In Black-Red???
There are some merits to playing Grenzo over Arcades. Grenzo is cheaper to cast, so that his magic can start working earlier in the game. He can also beat Arcades in terms of rebuilding resources from an empty board. Arcades requires you to chain defenders together to amass advantage in this situation, whereas each activation of Grenzo’s ability is independent of the last, meaning that recovery can be faster. Additionally, it’s much easier to cast Grenzo multiple times in a game, and playing with zero- or one-power creatures allows us to leave Grenzo at two power without having to invest oodles of mana when casting him.
Obviously, the main strength that Arcades, the StrategistArcades, the Strategist has over Grenzo, Dungeon WardenGrenzo, Dungeon Warden is that Arcades immediately turns a board of Walls into a nightmare to hold off. Arcades acts as a switch from full defense to flat-out offense. Unfortunately, black-red doesn’t have such a direct way to turn that switch, so we’ll have to be creative to play to the strengths of defenders, and that can be done in two ways:
- Dissuading opponents from aiming their attacks our way.
- Making other players a juicier target for attack, oftentimes by force.
War's Tough
Creatures with defender often pack huge toughness in exchange for very little power. This already makes it difficult for opponents to profitability attack and actually land a disruptive blow. To add to that strategy, there are a few Walls that make that combat even more rough for the opponent, like the punishing Wall of SoulsWall of Souls, sacrifice-outlet-then-deathtoucher Corpse BlockadeCorpse Blockade, and general oddball Aether MembraneAether Membrane.
To supplement the defenders that make attacks difficult for our enemies, cards like No MercyNo Mercy and MeekstoneMeekstone can ensure that creatures only get one chance to hit us, if at all. War’s TollWar’s Toll puts pressure on an opponent’s decisions, forcing them to go all-out or not at all. ChaosphereChaosphere deals with the one major conundrum of flying creatures in the best way possible - make flying act as non-flying and vice versa!
Organized Chaos
To keep on brand with War’s TollWar’s Toll and putting pressure opponents in the attack step, Fumiko the LowbloodFumiko the Lowblood and Goblin DiplomatsGoblin Diplomats can be used to bend combat to our will. Red even has a defender that makes this happen with Rage NimbusRage Nimbus!
"Swinging" In
As mentioned earlier, this Rakdos Walls deck won’t have a direct way to attack opponents, but there are sufficient analogs to that. Notably, Furystoke GiantFurystoke Giant and Kyren NegotiationsKyren Negotiations allow Walls to tap and deal damage. Close enough to attacking, right? The best thing about this strategy? With some sacrifice outlets and Grenzo's standard methods of putting cards in his graveyard onto the bottom of his library (such as Epitaph GolemEpitaph Golem), it's quite possible to loop Furystoke GiantFurystoke Giant over and over again to keep the “attacks” alive.
Since looping creatures back from the graveyard is highly possible with Grenzo’s low-cost ability, the old standbys Purphoros, God of the ForgePurphoros, God of the Forge and Impact TremorsImpact Tremors add extra damage for producing more Walls.
More Goodstuff
As mentioned before with the basic Arcades strategy, the rest of the deck is filled with 'goodstuff' interactions. There is a small non-defender package of all-stars such as Imperial RecruiterImperial Recruiter and Ravenous ChupacabraRavenous Chupacabra. Additionally, Helm of the HostHelm of the Host and Kiki-Jiki, Mirror BreakerKiki-Jiki, Mirror Breaker can make even more Vent SentinelVent Sentinels, or provide the kind of inevitably that helps end the game quickly.
All the Walls
Putting everything together, here is the complete Rakdos Walls list, ready to give Arcades, the StrategistArcades, the Strategist and Doran, the Siege TowerDoran, the Siege Tower a run for their money! Well, maybe not a 'run' for their money, as Walls usually just sit there. You get the idea, though.
Rakdos Walls
View on ArchidektCommander (1)
- 1 Grenzo, Dungeon WardenGrenzo, Dungeon Warden
Walls (19)
- 1 Aether MembraneAether Membrane
- 1 Amaranthine WallAmaranthine Wall
- 1 Consulate SkygateConsulate Skygate
- 1 Corpse BlockadeCorpse Blockade
- 1 Flowstone WallFlowstone Wall
- 1 JunktrollerJunktroller
- 1 Living WallLiving Wall
- 1 Mobile FortMobile Fort
- 1 Rage NimbusRage Nimbus
- 1 Shield SphereShield Sphere
- 1 Suspicious BookcaseSuspicious Bookcase
- 1 Tree of PerditionTree of Perdition
- 1 Vent SentinelVent Sentinel
- 1 Walking WallWalking Wall
- 1 Wall of BoneWall of Bone
- 1 Wall of DustWall of Dust
- 1 Wall of ShadowsWall of Shadows
- 1 Wall of SoulsWall of Souls
- 1 Wall of StoneWall of Stone
Rule Combat (7)
- 1 ChaosphereChaosphere
- 1 Fumiko the LowbloodFumiko the Lowblood
- 1 Goblin DiplomatsGoblin Diplomats
- 1 MeekstoneMeekstone
- 1 No MercyNo Mercy
- 1 Stuffy DollStuffy Doll
- 1 War's TollWar's Toll
Walls Win (5)
- 1 Furystoke GiantFurystoke Giant
- 1 Impact TremorsImpact Tremors
- 1 Kiki-Jiki, Mirror BreakerKiki-Jiki, Mirror Breaker
- 1 Kyren NegotiationsKyren Negotiations
- 1 Purphoros, God of the ForgePurphoros, God of the Forge
Grenzo Frenzos (3)
- 1 Canal DredgerCanal Dredger
- 1 Crystal BallCrystal Ball
- 1 Epitaph GolemEpitaph Golem
Card Draw (5)
- 1 Ancient CravingAncient Craving
- 1 Chandra, Torch of DefianceChandra, Torch of Defiance
- 1 Ob Nixilis ReignitedOb Nixilis Reignited
- 1 Phyrexian ArenaPhyrexian Arena
- 1 Read the BonesRead the Bones
Ramp (9)
- 1 Ashnod's AltarAshnod's Altar
- 1 Iron MyrIron Myr
- 1 Leaden MyrLeaden Myr
- 1 MillikinMillikin
- 1 Palladium MyrPalladium Myr
- 1 Seer's LanternSeer's Lantern
- 1 Sol RingSol Ring
- 1 Talisman of IndulgenceTalisman of Indulgence
- 1 Treasonous OgreTreasonous Ogre
Sacrifice (4)
- 1 Dark-Dweller OracleDark-Dweller Oracle
- 1 Dimir House GuardDimir House Guard
- 1 Disciple of GriselbrandDisciple of Griselbrand
- 1 Goblin BombardmentGoblin Bombardment
Utility (12)
- 1 Chaos WarpChaos Warp
- 1 DamnationDamnation
- 1 Demonic TutorDemonic Tutor
- 1 Fulminator MageFulminator Mage
- 1 Helm of the HostHelm of the Host
- 1 Imperial RecruiterImperial Recruiter
- 1 Lightning GreavesLightning Greaves
- 1 Meteor GolemMeteor Golem
- 1 Rakdos CharmRakdos Charm
- 1 Ravenous ChupacabraRavenous Chupacabra
- 1 Toxic DelugeToxic Deluge
- 1 VandalblastVandalblast
Land (35)
- 1 Blood CryptBlood Crypt
- 1 Bloodstained MireBloodstained Mire
- 1 Command TowerCommand Tower
- 1 Dragonskull SummitDragonskull Summit
- 1 Foreboding RuinsForeboding Ruins
- 1 Graven CairnsGraven Cairns
- 1 Luxury SuiteLuxury Suite
- 1 Smoldering MarshSmoldering Marsh
- 1 Sulfurous SpringsSulfurous Springs
- 1 Tainted PeakTainted Peak
- 1 Temple of MaliceTemple of Malice
- 1 Zhalfirin VoidZhalfirin Void
- 14 MountainMountain
- 9 SwampSwamp
Rak(dos)-ing It All Up
One thing to keep in mind with this build is that the vast majority of creatures here are power two or less, but you will get the best value out of Grenzo when he sits at three power. It really can depend on the game you’re in. Additionally, don't hesitate to swap some of the utility spells and creatures to specialized cards that work well in your playgroup!
All in all, you don’t need to be a Rakdos Shred-FreakRakdos Shred-Freak to play black-red. You can just as easily sit in your Luxury SuiteLuxury Suite and watch the attacks fly elsewhere beyond your walled empire. Who would have imagined that such an aggressive color pair can be so aggressively defensive?
Jeremy Podczerwinski
Jeremy is a data analyst in his hometown of Chicago. He is the commissioner of a Commander league at a local LGS, Near Mint Games. He is also a board member for AnimeChicago, an non-profit anime club for adults, and an avid craft beer fan.
Your opinions are welcome. We love hearing what you think about Magic! We ask that you are always respectful when commenting. Please keep in mind how your comments could be interpreted by others. Personal attacks on our writers or other commenters will not be tolerated. Your comments may be removed if your language could be interpreted as aggressive or disrespectful. You may also be banned from writing further comments.
